Archive for the ‘sculpting’ tag
Discovering Chris Guarino at Art On 5th
We had an exhibit in South Austin not long ago that featured some Salvador Dali works. And while those were great, and while I was also excited to find some Dr. Seuss works in the same show. I wanted to type a bit about someone you may not be so familiar with already. As you first walked in to Art On 5th (which isn’t actually on 5th St at all, but that’s not really important right now), it was impossible not to be taken with a sculpture.

The piece is called “Undersea Queen” and it’s beautiful. It was not only strikingly eye catching as you walked in, but the included detail continued to impress as you came in for a closer look.
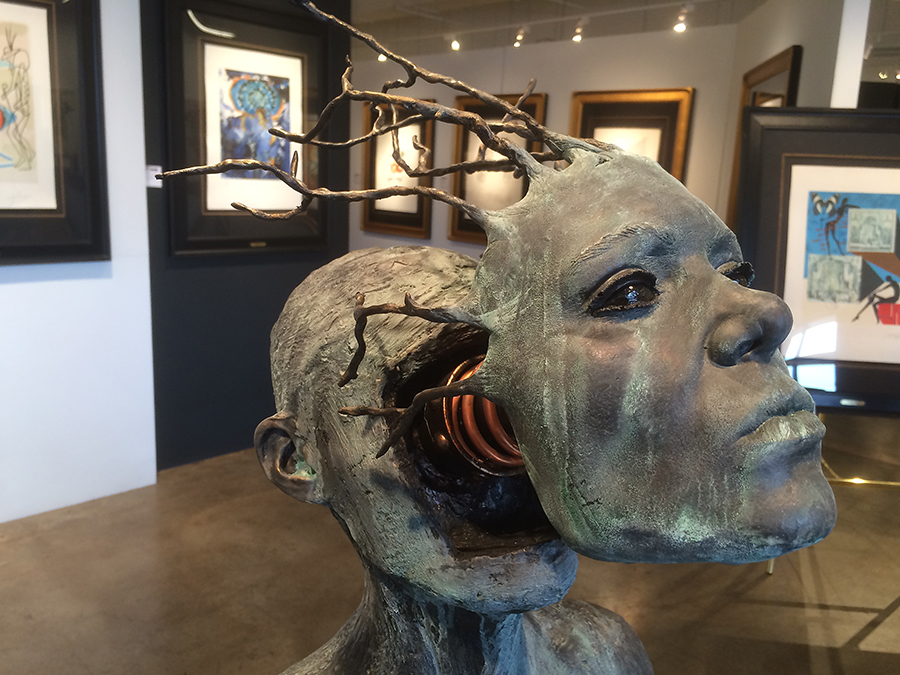
Having spent a lot of time doing anaplastology work, it was clear that these details were taken as impressions, and then worked into the sculpture. That’s the kind of detail that impresses me, so I wanted to know who this artist was.
So now I’m going to share with all of you, the work of Chris Guarino, who seems to have roots in Denver, San Francisco, Chicago, and now also Austin. I have to admit, I half expected to find a fellow biomedical visualization alum when I saw Chicago mentioned on his website. This is just such an exquisite use of impression taking and casting for fine art sculpture. But instead I found his site on life casting. So I just wanted to draw a little extra attention where attention is due. I’m refraining from reposting any images directly from his website here, but please do take a look at the linked sites here. There are some fantastic pieces in there.
Chris Guarino is also planning an upcoming solo showing at the same location this May 21st which will include work from his Masquerade series, as well as some new pieces.
Chewbacca!
So, as much as I’ve been enjoying the new job lately, I have missed getting my hands into some sculpting. So, a little while back, I sat down to play with some Super Sculpey. Typically, skulls are my go to practice piece. But there is this guy who works at my company, that really loves Chewbacca. I also got that song stuck in my head, the one by Supernova that goes “Chewbacca, what a wookie!.” I never get to sculpt hair. Skulls don’t have hair. But this time, I got to break out the Zylenol, and play with hair.
He started off all crazy looking.

But I just kept adding to him.

And baking when I liked something and adding a little more. I even managed to work in little highlights using the way the Sculpey darkens with more time in the oven to a color advantage.

And yeah, I had fun with this one. And the guy at work really liked it.

Hmmm, what to make next…
New Skull
I recently finished up one of my old little skulls. I still haven’t started reproducing any of these little guys yet, but a buyer contacted me not long ago for the originals I have around so far, so that’s encouraging to get back into it. I wound up baking this last one completely black, but that just makes it strong. Hopefully I haven’t lost too much detail in the coloring. I think that getting back to these is really good practice for me while I’m out of the clinic. Working in polymer clay is very different than working in wax, but I think that any kind of working in shape and form like this is good practice for me.

Gonna polish this little guy up a touch with some denim or something and I’ve got a bundle of skulls to send off to someone 🙂
Back to Sculpey

I’ve been playing with Super Sculpey again. This week I got back in to skulls. I hadn’t done that in a while. This was my first attempt at recreating the various foramen underneath, and still keeping a mandible in place. It didn’t come out perfectly, but I’m pretty sure that I could get it the next time now.

I still need to make one perfect one, so that I can recreate them in a mold and have my very own basket of pocket skulls. I still think it’s the perfect study aide for students trying to learn the foramen. When you’re a student, you learn to treasure the things that you can take with you on the bus, or just walking around that let you review certain basics in those spare minutes of your day. Maybe next week, I will do this right, once and for all.

In the meantime, it’s been good getting some practice in with sculpting in general. I think that I may always come back to skulls for this purpose. They can be as complex as you care to make them, or not. And really, everyone loves a skull. 🙂
Happy Halloween
Happy Halloween everyone!

Enjoy this amazing pumpkin carving by artist Ray Villafane from Michigan.
Skulls!
Ok, so I saw this over at Street Anatomy and it made me happy…

It is by Russian artist, Dimitri Tsykalov.

I myself have been playing around with skulls again lately. There is the skull I am working with in 3DsMax, and also my latest pocket skull I sculpted amidst the crazy of all the tech support it took me to get back to my digital 3DsMax skull.

Lately I prefer making these little guys without the mandible so that I can put in all the little foramina underneath.

Unfortunately with this one, I broke the left styloid process before I got around to photographing it or reproducing it. Honestly though, I can make a better skull than this. Hopefully I’ll find the time to do another one soon, because I think if I did another one while this one is still fresh in my mind, it could be really cool, and that one would be worth reproducing in resin.
So many things to do, so little time.
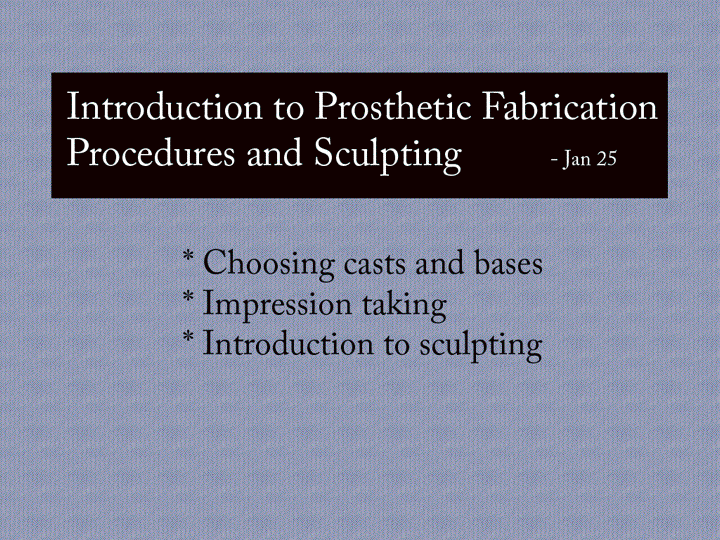
Anaplastology Class in Review
One of my classes from last semester wrapped up with a comprehensive Power Point presentation detailing the process we had gone through and what we had learned throughout the semester. I thought I would go ahead and share my slides here.

This was a condensed course wherein we went through the process of making a prosthetic ear with Rosie Seelaus.

We started the semester off with a silicone technology workshop with guest lecturer Leo Basil. This was a real treat for me, as I’d been giving a lot of thought to materials around that time. He spoke a lot about the four primary modifiers of a silicone; polymers, fillers, cross-linkers, and catalysts. Apparently the length of the individual polymer chains in a silicone directly affect the viscosity of the uncured silicone and final elasticity when it is cured. Longer chains create a more viscous fluid and more elastic final product whereas shorter chains will create a thinner solution which cures to be harder.
Your filler can be anything, and a silicone company is unlikely to tell you all their secrets here but it is another way to affect viscosity and thus elasticity. It’s also a common point in the recipe to play with things to increase tear strength, and colorstability, or affect the way the silicone reacts to water.
Your cross-linker is used to harden the polymer material. It literally adds links between molecules. So if you use a lot of it, you wind up with something very hard and brittle because you’ve taken out all the give. Now the cross-linker is the part that is often called the catalyst these days. I’ll discuss that further in the next paragraph.
Now discussing the catalyst gets a little confusing. From what I understand, this is the part that traditionally was added in to set off the reaction, as the definition of the word catalyst would lead you to believe. It can either be platinum or tin, though platinum based products are vastly preferred. Tin based silicones have a bad reputation, because many people working with them have sensitized over time and suffered some bad reactions to them. That history has led many people to upgrade to platinum based silicones, and it has also led silicone companies to predominantly change the way they sell these products. These days the catalyst is actually a part of the uncured silicone when it comes to a clinic or workshop, and it’s the cross-linker that gets added as a catalyst, and often referred to as catalyst. But when silicone manufacturers talk about the catalyst they mean the platinum or tin aspect. Anyway, platinum is the better one. It’s more expensive, but it’s better for the health of the people working with it, and it’s also better for accuracy. Tin based silicones shrink ever so slightly because molecules are lost in the curing process. It’s not very noticeable in the reproduction of an ear, but I am told that in larger pieces it does become noticeable.
There was more to the workshop than that, but if you can understand that, you’re on a good start to understanding silicone.

So the next time we got together was our first official class with Rosie.

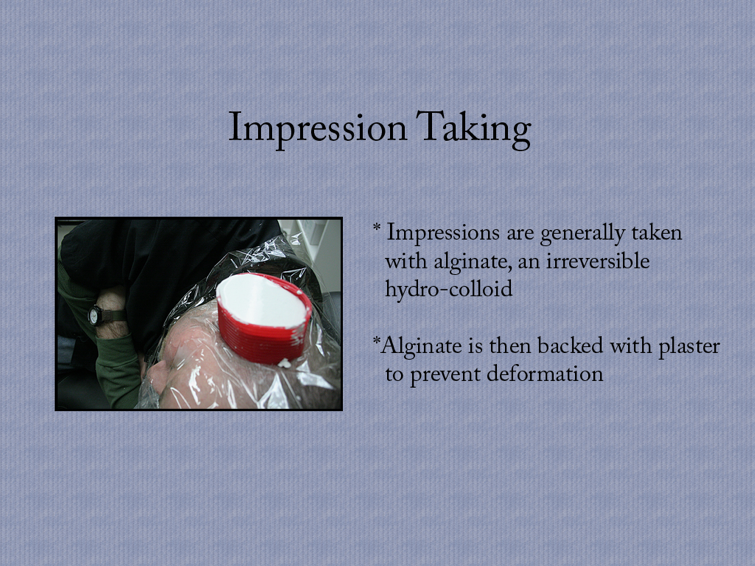
The bases featured above are meant to represent the anatomy of a patient. The idea is that if you were sculpting a prosthetic ear for someone, you would need to tailor the piece to fit patient. Because patients who come in for a prosthetic ear already have some anatomy in place , an anaplastologist would have to design the prosthesis around that individual anatomy.

Impression taking is how we get those bases of the patient’s anatomy, and in this photo, we are also using it to take an impression of a fully formed ear. If a patient is missing one ear, but has another one, this is how that other ear would be captured so that a match might be sculpted. After the impression is taken, a cast can be poured.

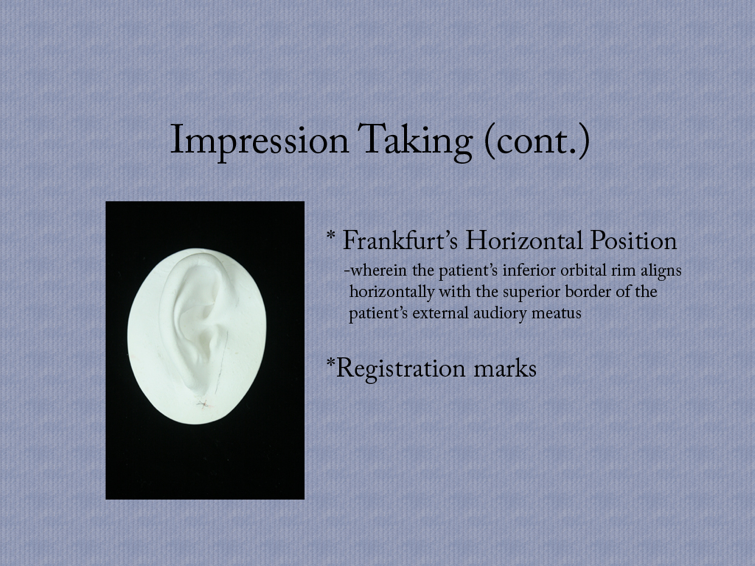
Frankfurt’s horizontal position is an agreed upon positioning of the patient’s head meant to help an anaplastologist maintain orientation while working on a prosthetic ear as to just how it will sit on the base. The idea is that you put the patient into this position, and then you put the registration marks onto their skin. The marks get picked up in the impression, and even transfers one more time into the final cast. By then you’ll probably want to darken them, but the idea is that you have a guide with which to orient yourself.

We got into a discussion of materials that day as well.
Fast set plaster has especially fine particles. It is a really weak stone. Gypsum has been refined to produce a harder denser stone. And dental stone is harder still, but wait there’s more! We have improved dental stone to top the regular stuff! And then there is fuji rock which is a finely milled, very dense, very hard stone.
Then in the wax family, we have baseplate wax. This stuff is fairly hard and very pink. It’s a standard in the creating of dentures and I think that’s how it became such a standard in the anaplastology field. Beeswax is softer, and more of a natural color. I’d actually like to work with this stuff some more. I like materials I can manipulate with my hands, and beeswax is soft enough to allow for that. Boxing wax is also soft, but it’s primary use is for boxing in plaster or stone. You can see it being used in the impression taking slide from before. It’s bright red, and yes it will stain your fingers if you keep playing with it. It comes in handy sheets though, so it is very easy to wrap it around a base or create a confined area for work. And then I think we all have some sense of what clay is. For the purposes of our class, we actually used a blend of clay and baseplate wax.

For the introduction to sculpting, attention to measurements was really emphasized. The tool you see on the left up there is a caliper. Attention to detail at this point when you are first laying down wax will save you time later. If you can establish size and an outline, and match the projection of your model ear, then you can go back in and create the inner contours. The wax shape alone without detail is sometimes called an apple wedge. You’ll notice I also have a transparency up there. This is a great tool, because it allows you to flip the image to see the contours as you will sculpt them in your match. All of this is done with hot wax and some metal tools at this point.

Here I’ve included the ear labeling assignment. I did it first with Photoshop and then was asked to go ahead and do it again in pencil, just for the practice of thinking about those shapes. I have a version of this in Power Point that doesn’t show the pencil side, but rather highlights each of the anatomical areas of the ear. But since this is all being viewed via the web, all those slides just seemed a tad exhaustive. And if you’re really interested, this is an image that I have up at a larger scale in another post anyways.

The image you see on this slide is of the model trimmer. This is really useful in getting those casts and bases level and with an even shape all around. Other fine tuning elements include final texturing you may decide to do to the sculpture itself. For instance you might dimple the wax with an old toothbrush. This breaks up the way light hits it, so it reduces shine, and just provides a little more realistic of a texture. It is also really important to establish a good anterior margin. You want this to be thin, and easy for the patient to smooth down against their skin. It is best to avoid straight lines as well, as these will catch the eye. Instead, you’re aiming for something that will blend as seamlessly as possible.

We met in the clinic one day to look at our individual sculptures and get some feedback before it was time to set these in stone. There was a lot of talk about the tools we had available to us. In my particular case I was having a problem with smoothing out the areas in the tighter spaces. None of the tools in our lab were quite getting in there. There is a tool that is kept in the clinic that is good for that but I wasn’t able to stick around and take advantage of that after our consultations, so I wound up making that tool that you see featured up on the right there. It’s part paperclip and part super sculpey, baked hard. But I think even more useful than that was the little toothpick you see in the larger picture just before the heat gun. It’s amazing how helpful a burnished toothpick can be in sculpting. I learned that one from Ian Coulter, and it just keeps coming in handy.

Once the sculpture is done, and the cast is clean, you can start making the mold. For our purposes we used a three-part mold.

As you can see, you wind up with this nice compact little cylinder.

This is where you hope you’ve done your work well, because the wax sculpture that you put so much effort into is about to get melted. We use two pots for the boil out so that if the first gets dirty, you still have a second pot to remove excess wax residue. It’s really important to get all the wax off from the molds because any residue left behind could inhibit your silicone later and keep your final prosthesis from curing. You also don’t want to leave your mold in boiling water so long that it starts breaking down either. As with most things, you’re looking for that happy balance.

To do this right, you want to mix up a series of colors, not just one. This allows you to mimic the way skin is made up of lots of colors (much like the subsurface scattering modifier in 3DsMax, for those of you who work with that), and also create the illusion of depth in certain areas where appropriate.

The silicone colors are stippled into the mold, and then the whole thing gets clamped and placed in a warm oven. We did this in layers, starting with the red glaze and oven curing in between to keep the colors from mixing and in place where painted. Unfortunately we all had some trouble with the development of air bubbles at this point. There are various strategies to get around this, so there is hope for next time. And one thing that Rosie mentioned which I found interesting was that you often get more bubbles when you oven cure your layers rather than leaving them to bench cure overnight. Obviously leaving every layer to cure overnight makes the whole process take a lot longer, but if you’ve read my documentation of mold making at home with Ian, you might have caught my mention of the difference in the air bubbles between the side of that rubber silicone mold that took over a day to cure, and the second half that I sped up by adding a little extra catalyst to the mix. It’s the added time that allows the air to escape.
Once all layers are in place, the rest is filled with the base color, and the mold gets clamped shut. In my case, I had the problem of my mold breaking under the weight of the clamp. Some of my other classmates had the same problem. I am pretty sure we were using the wrong batch of stone in the lab.

First scissors, then dremmel. The dremmel part works better when you don’t have any air bubbles, but this was a learning process.

When all is said and cured, trimmed and awesome, you get a chance to look at it and ask yourself if it needs a little more color in this spot or that. These are the little touches you can add on with extrinsic coloring. It’s best to have things as close to perfect as possible intrinsically though, because it’s the extrinsic layer that takes the most day to day damage from the world. It’s like the difference between silver painted jewelry and actual silver jewelry. No one wants their ring to get old and worn and start showing copper underneath.
The extrinsic colors are mixed with Medical Adhesive, and painted directly on to the prosthesis. Medical Adhesive, or Med-A as it is often called, is actually a tin based silicone. I think it is more widely accepted than other tin based silicones because it cures just by virtue of being left out in open air. That certainly makes it more convenient anyways. I’ve heard that it can be an irritant to people working with it, but it certainly doesn’t have the bad reputation that other tin based silicones have, and it is widely in use across clinics. In fact a lot of the people who work with it in clinics will go so far as to use it for various household repairs. I wish I could report on what makes this stuff okay, and not the other, but the truth is I don’t know. Maybe it’s just as bad and we simply use it in such small quantities that it doesn’t cause the same problems. Or maybe someone has done something brilliant and one of you fine readers will tell me all about it.

So there is my final prosthetic ear from this semester. All in all I think it came out pretty well. The air bubbles are probably the greatest flaw, and I’m sure my ability to sculpt like that will improve with further experience. I got a little freckle and mole action in there that I was really happy with. I’m thinking that my success with those had a bit to do with having used so much flocking in that part of my mix. If you’re not familiar with flocking, it’s the fuzzy stuff they make pool tables out of and it makes a fun addition to silicone when you’re coloring. I hear it also helps to hold silicone in place before it’s cured, much like Thixo or an anti-slump additive would. My anterior margin isn’t quite as smooth as I would like it to be, but the overall form came out well. It is certainly the best prosthesis I have ever made.

New Tricks For Me in Mold Making
Recently I had the opportunity to learn about a different kind of mold making. In my modeling classes at school, we have worked in plaster, and constructed 3-part molds for prosthetic ears. This time I got a glimpse into some different tactics and materials for mold making with sculptor, Ian Coulter.
The first thing was finding something to copy. After a lot of sculpting and striving for that perfect thing to replicate, we decided to take something old and flawed, and really push the limits of what we could get. So we picked an old sculpture I had done of Norman Mailer, my first likeness, which minutes after baking I managed to slam a lid onto and crack open.

The next step was making a box to house the mold. For this we started with a milk carton.

I am told that some people go to a lot of trouble to build wooden boxes for this purpose, but the wax paper used in your basic carton seems to do the trick just fine. So we got to cutting this one open.

Once cut open into a foldable box, the sculpture gets placed onto a soft round ball of molding clay. We called this ball the base.

We then went ahead and drew a line around the point to which we intended to build this half of the mold. And then we made long snakes out of the modeling clay and began wrapping outward to fill that half of the mold.
We used smaller snakes right around the sculpture, and larger snakes as we reached the edges of the box. Using the snaked shape helps later when you have to get all this stuff back off again.

The clay will then be smoothed out to prevent the rubber from seeping down into the cracks when it gets poured later.
A toothpick makes a good tool for cleaning up the area right around the sculpture itself.

A heat gun makes a good tool for melting the fingerprints out of the clay and getting things extra smooth.

Keeping the surface of the clay smooth is important because this will become the surface between the two rubber halves of the mold later on, and any divits or scratches could potentially become mechanical adhesives and cause problems with opening and closing the mold later.
Next it was time to think about where we would be pouring in to. We chose the base of the head because it had less detail than the face or hair and therefore could be sanded off if need be later.
We cut a straw and placed it to create this space.

Using the cap of my X-acto knife we set up four primary keys around the piece.

We used a sharpie to set up some lesser keys as well. The important part about this part is ensuring that these indentures go straight up and down. Once again, you want to avoid mechanical barriers to opening your mold back up again. But you do want both sides of the mold to lock into alignment and resist side to side slipping.

The next step is getting that box back together and sealed up with tape.


Now you’re ready to mix up some rubber!
In my case it was Aero Marine silicone RTV rubber, with purple catalyst.

As is typical with silicones, you mix them at a 10-1 ratio. It makes a big goopy mess, and you can take your time getting it into the box because this stuff takes a good long while to dry.

Once your rubber is mixed, you can get the best results by painting some directly on to the sculpture. This allows you to push the material into all the cracks and crevices and avoid air bubbles getting caught in your detail. Use a brush you don’t mind loosing for this task.

Then you can just pour the rest over the top and let it settle on down. When I did this I made it a point to rattle the box a little, pick it up and drop it a few times, to move any trapped air upward. At school we have an actual vibrating plate to do this with plaster. This rubber actually did a pretty good job moving air upward on it’s own, what with the slow drying time. This half of the mold took about a day and a half to dry. The other half I sped up by adding more catalyst and as a result did catch more air bubbles in that half (though still none anywhere that really mattered).

We left the rubber to set for the next couple days, braced between a bottle of oil and the package of modeling clay for extra support. With the slow dry, you could actually blow air bubbles away off the surface as they rose to the surface.

I wound up waiting longer than I needed to because rather than put fingerprints into the mold itself I was testing the bowl and spatula where the rubber had been mixed to know when it was cured. Well I hit a surprise when something was going on with the spatula that inhibited the curing of the rubber.

I have no idea what caused this. Ian tells me that he has used a similar spatula time and time again for this process. My only guess is that some chemical be it from a food or cleaning agent affected the rubber of the spatula over the years and turned out to be an inhibitor. I never was able to fully get the stuff off of it.
The mold itself set just beautifully though.


Once open, I just flipped it over and started peeling away the modeling clay. It is important when you do this not to move the original sculpture. I found it helpful to remember the base we had started with when I got to this part. That little circle marks the most clay against the sculpture.


From here you just want to trim up the edges of your mold and clean off any excess modeling clay that has stuck to your original sculpture.

Once cleaned up, it’s time to paint some release over the rubber. I went ahead and coated the sculpture too on account of all the detail in the hair.

Unfortunately the product I used for a release turned out to be a poor choice. I have since been advised that the important detail to look for is that you use something acrylic. In my case I used a polymer varnish that I commonly use with my acrylic paints, but that is not acrylic itself. Next time I intend to use my Speedball matte medium acrylic polymer instead.
Once the release is set, it’s time to tape the box back up and pour the other side. Again, you want to start by painting the sculpture directly first.

In my case, I tried placing a little piece of Super Sculpey against the wall to help with opening the mold later. Given the troubles I had with the release, this did wind up helping a little, but really that’s a more useful trick in plaster than it is in rubber. Once this side has set, you have yourself a mold!

It’s a really strong mold too. When the release I painted failed, I knocked this thing all over the place trying to get it open. I literally jumped up and down on top of it at one point to loosen the seam. It was literally an all day process ripping this thing open.

And then finally, I had an open mold!

So then I checked the channel left by the straw, ensuring clear passage for the resin to pour, and cut a funnel shape into the surface side of the mold.

If you intend to use the mold for a lot of copies, it’s best to use some form of barrier around the sculpture’s impression to prevent the mold from drying out. I didn’t use anything for the first couple pours, but then later I experimented with baby powder. I’m told that WD40 is great for this as well.
You then want to close the mold and band it together.

The resin I used was a two part mix, mixed at a one to one ratio. From what I understand, this is typical of resins.

Before you start mixing up your resin, it’s best to have some idea how much you’re going to need. To accomplish this, I poured some water in a cup and marked a line at it’s surface level. Then I placed the sculpture into the water and marked the point to which the water level rose. Doing this with an actual measuring cup would of course be a more accurate accounting for the amount of resin needed, but I didn’t have one handy, so the visual was at least helpful in making an estimate.

The resin once mixed, gets poured into the funnel shape, and down the channel to fill the impression inside. The resin starts setting up in about ten minutes time, so you have to do this quickly. My first pour ran into trouble, as I kept getting stuck on the air inside by pouring down the only channel. This made the pour too slow, and before I could get it all in, the resin began to heat and harden and I was out of luck.

So before pouring the next one, I cut in an extra air escape channel. I’m told that with practice it gets easier to keep the poured resin stream thin enough to run down the edges and not require an extra air channel. That makes sense, but this was easier.

It worked like a charm too. The next pours went much better.
The only problem I continued to have was the one piece of the mold that rose slightly above the pour point. Try as I might, I couldn’t quite get a solid pool of resin in there.

When I got a chance to ask about it later I was advised to cut the pour channel to bring resin in from the top. I haven’t tried that yet, but it sounds reasonable. The next mold I make, I’ll be sure to channel the pour in to the highest point in the sculpture to avoid similar difficulty.
All in all, I was really impressed with the accuracy and detail of these materials. The resiliency of the rubber was really impressive as well. To be able to go from literally jumping on the mold to getting such impeccably detailed copies was really amazing.

I am really looking forward to utilizing the rest of this stuff for my next project – pocket study skulls!
If you would like to see more images from my time experimenting with this stuff, I’ve posted them all over at http://snapshotgenius.com/gallery/firstrubbermold
Making an Ear
Another project I’ve been working on lately has been to sculpt the ear of one of my classmates.
Last year we all took impressions of eachother’s ears using algenate.

The idea is to create a cast of one ear, and then use that cast to create a match for the other side. In anaplastology, this kind of scenario comes up often as a patient may have one good ear, and wish to receive a matching prosthesis for the other side.

The new ear is sculpted using a combination of base plate wax, clay, and a few crayons for coloring. I believe in most clinics models like this are made solely in wax. It is sculpted onto a base plate which is meant to mimic the anatomy of the patient’s head where the prosthesis will be worn.
Then just recently we finished off by pouring a plaster mold around the wax sculpture and boiling the wax out, to leave the plaster mold behind.

In another week or so, we will paint colored silicone into the mold and use it to create silicone versions of our wax sculptures.
It’ll be ears for everyone!

Little Skulls
Before I moved to Chicago, one of my favorite sculpting exercises was to sculpt little skulls. This week we finally moved on to the head and neck portion of gross anatomy, and the first thing I did was pull out the skull we got from the class and and few pictures from my textbook and start sculpting again.

The skull I had in hand wasn’t in too good of shape, so I wound up trying my hand at a skull without a mandible for a change. This wound up being fun, because I wound up paying much more attention to all the little foramen and structures on the base of the skull than I normally would. There are so many little nooks and crannies.

It’s far from perfect, but a good exercise nonetheless. And who knows, one of these days I might just get good at this.