Archive for the ‘C4D’ tag
Molecule Rigging
Some of you reading are familiar with using the epmv plugin within Cinema 4D. Gary Welsh came up with a workflow for rigging those downloaded molecules to make them dynamic. I haven’t tried this one myself yet, but it looks really cool. I wanted the reference for myself, so I thought that I would share it with anyone else reading as well.
If you go to the YouTube page directly, you can even download the .c4d file directly.
The Moon’s Formation
Today I finally got the go ahead to share one of the astronomy animations of late. It looks like we may change something about the sun on the first one, but this one is staying as is. This was definitely the crazier of the two to work on so far. I don’t really ever get requests to crash things when I’m making bio animations. So I did a few tests in advance of taking this one on, where I discovered the Voroni Fracture, which is super fun, especially when combined with the push-apart and random effectors. Unfortunately, by the time we got the textures fully set and introduced a molten core, every scene that used Voroni fractures wound up taking forever to render. There are spots where I would have liked to do it a few more times to finesse some of that stray space debris and get it just so. But overall, I learned a lot working on this, and it was fun to try something different.
It’s been a while since I’ve been able to post anything fun from work on YouTube. For a while there, most of my animation work was either going into larger interactives and needed that context to make sense, or was really small, and again best within the context it was being made for.
I’m looking forward to doing more of these. And when we get things settled with that first one I’d like to show it off too. It’s less smash and more elegant. I think it’ll give viewers a good aha moment, and well, that’s my favorite part of working on things like this. Well, that and the part where the details of my job involve all kinds of cool scientific knowledge. Really, prior to making this, I don’t believe I’d ever heard this explanation for how our moon formed.
Oh, and I can’t forget to mention this awesome find for textures. I only used them a little in this animation, but I’ve gotten good use out of the textures that are freely available from Solar System Scope. It’s a lot like taking them directly from NASA, only these folks have already done the work of taking NASA’s telescope images and stitching them together to make a perfect texture for application to a sphere in whatever 3D program you might be using. It’s really made working on these kinds of images nice. So big thanks to them, and obviously to NASA.
Cinema 4D’s Use in Medical Illustration
I ran across this today and posted it to the Anatomy and Art Facebook Page (Did you know that I have one of those? I totally do!)
http://renderositymagazine.com/how-cinema-4d-became-a-primary-tool-of-medical-illustrators-cms-1521
Anyway, it’s all about how C4D became such a go-to for medical illustrators, written by Nick Sorbin of Renderosity Magazine. And it really has. I know I’m happy to be working with it. The MoGraph tools are really powerful. And it works great with the ePMV plug-in. I just wish I could affordably get myself a copy at home as well as the office. Come on Maxon! Hear my wish!
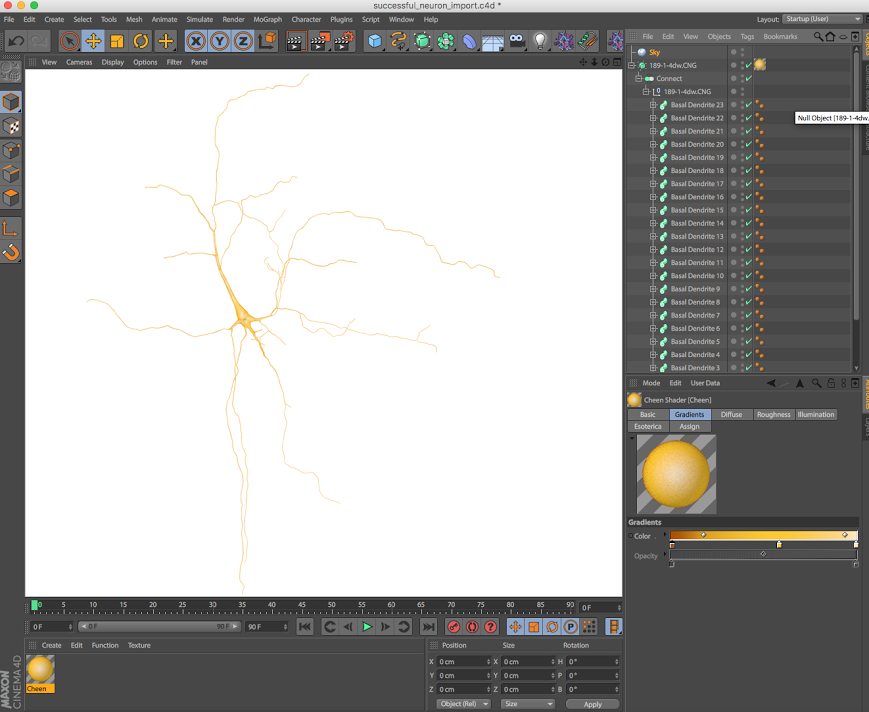
Neurons
So I recently learned about some very cool things. First off, there is a site out there that catalogs neurons http://neuromorpho.org/ It’s great, you can browse them by brain region, by species, by cell type, and pull up and view a vast assortment of known neurons. So that’s pretty awesome on it’s own. But I was lucky enough to learn about this site in connection with the work of Nick Woolridge, who has been writing code to make the data found there importable into Cinema 4D or ZBrush. This is his video on Vimeo explaining the process of using this data in Cinema 4D and where to find his script.
Using the NeuronBuild C4D script from Biomedical Communications on Vimeo.
Some of the larger neurons can bog down the computer, but I had good luck trying it myself, and I’m really excited about having this available.
C4D Live Tutorials Airing Presently
I am a fool not to have mentioned it before, but the NAB is offering some great tutorials online right now. There is a fantastic one airing right this moment about mograph and dynamics in medical animation by Thomas Brown. Do check out http://www.c4dlive.com/ if you get a chance today, or through Thursday.
Showing Exponential Growth in Bacteria
So I got an interesting request from the math department at Sapling Learning about a week ago. We wanted to show the concept of exponential growth, using bacteria as the example. So one bacterium divides into two and they each divide into two and so on. We decided to take this through six generations landing us with 64 bacteria on screen by the end of it.
So the catch was, how to move 64 bacteria around as one, and then as two with an equal number of divisions nested inside and then as 4, each with an equal number of divisions inside, and then as 8 and so on. So I got a little complicated with my object hierarchy for this one.
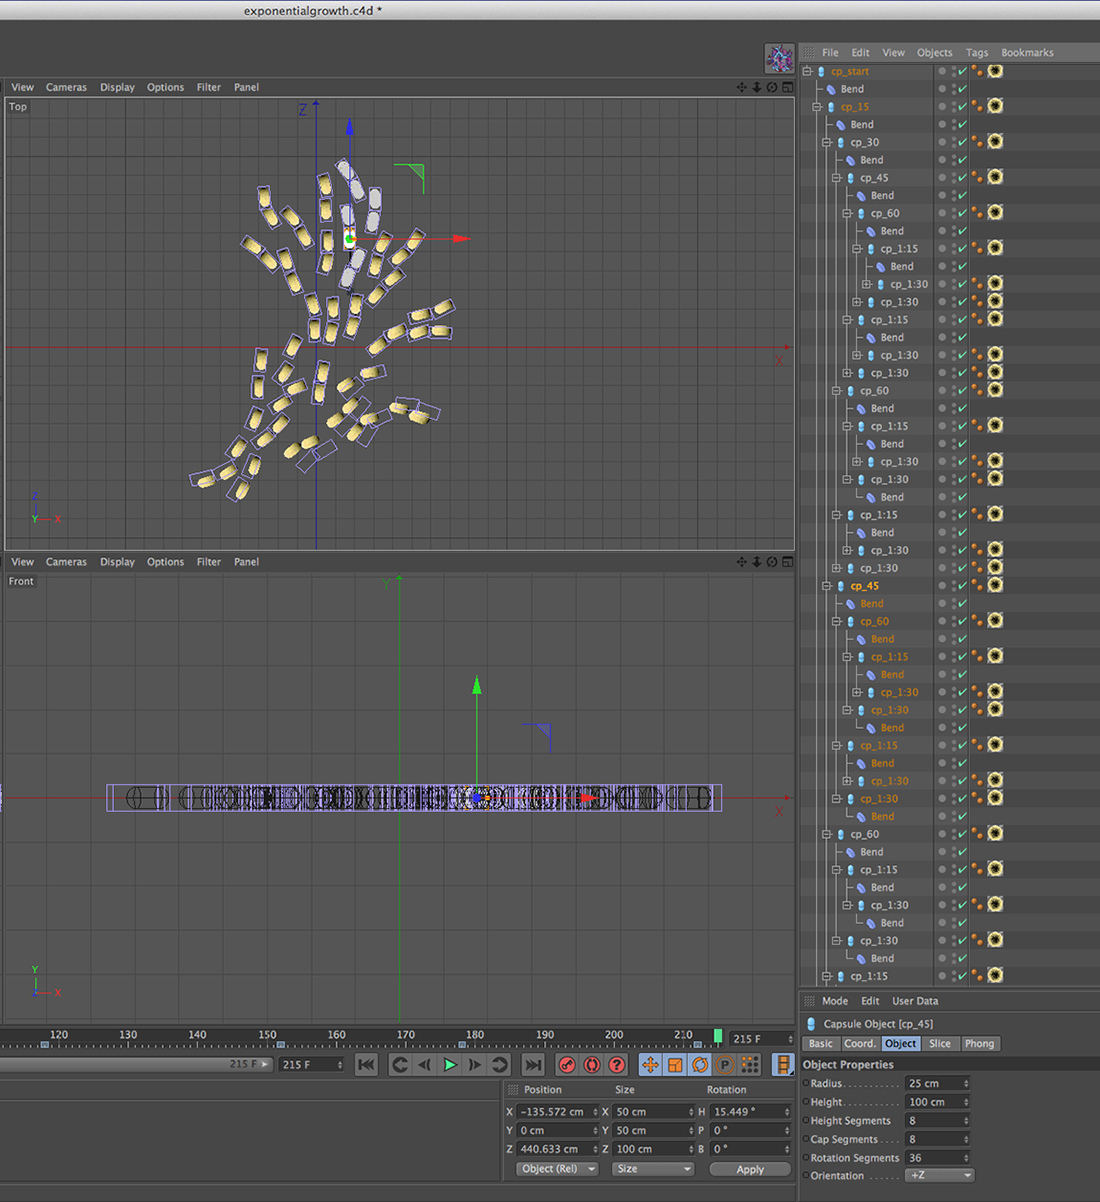
So I had one called cp_start, short for clostridium perfringens (a bacterium capable of reproducing at the 15 minute generation cycle that we wanted for the example) with a bend object on it. And then nested within that one was a duplicate called cp_15, another called cp_30, cp_45, cp_60, cp_115, and cp130, to represent the ones that would branch divide off at the 15 minute, 30 minute, 45 minute, hour, hour 15, and hour thirty points from that one, all with their own bend objects. Then within each of those I had further duplicates that would still occur from each of those. Within cp_45 there was cp_60, cp_115, and cp_130, but cp_60 would only have cp_115 and cp_130. And then so on with each bacterium.
In the end it worked out, and the extra arranging effort was well worth it as the sprawl pattern of bacteria had to be adjusted after the first time. My first attempt had them all more compactly arranged, but one of our biology experts explained that bacteria could only continue a regular exponential growth cycle if they were able to get to more food. If I hadn’t had them nested like this, it would have been incredibly hard to go back and make them disperse further.
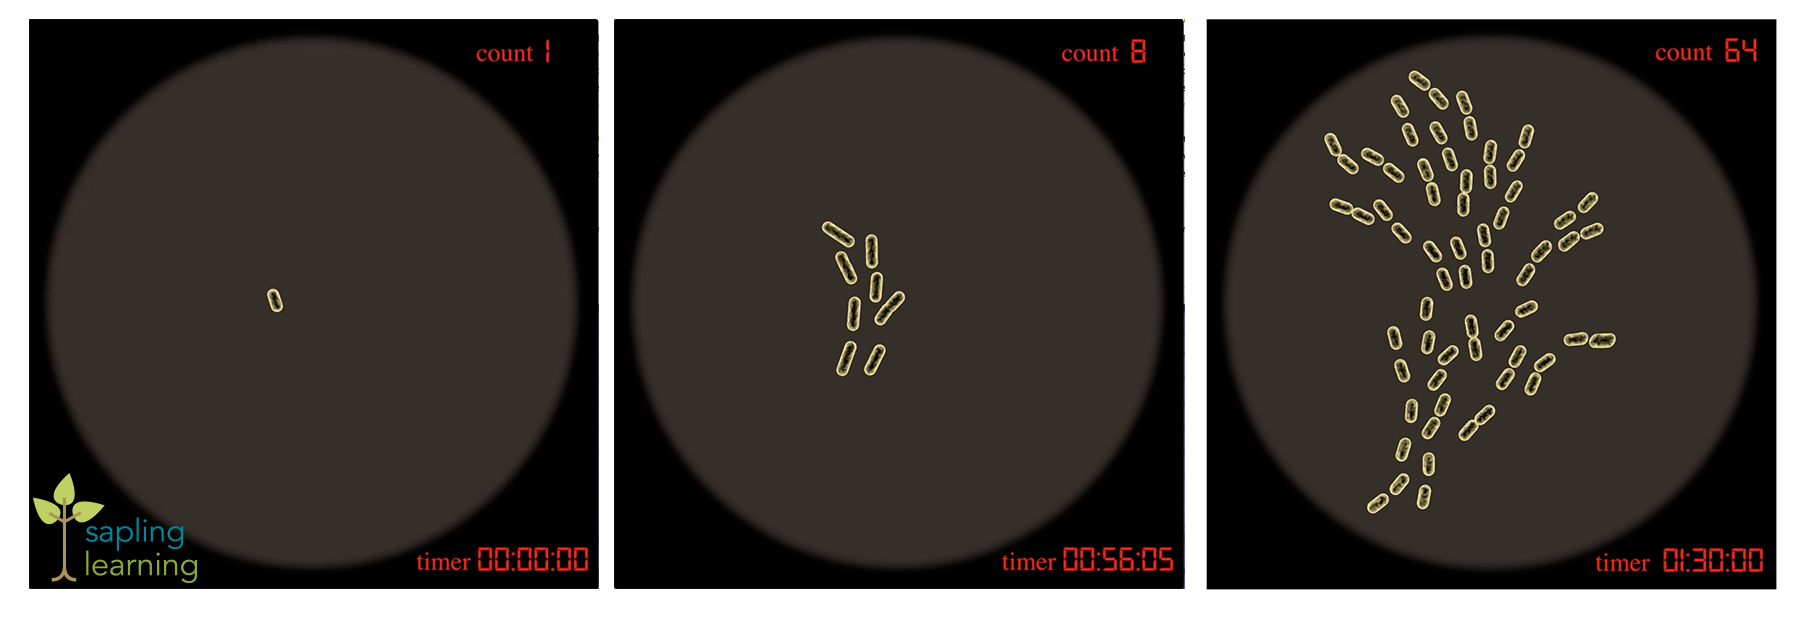
I added the timer and count in After Effects. The whole thing plays at a sped up pace, showing one minute per second of animation. And I think it looks good. I hope that we get to use it for biology content someday as well as for the math example now.
DNA Replication – 3D Animation
Hello again readers! I’m so happy to be able to finally share with you all an animation that I worked on some months back for Sapling Learning. Some of you will recall me writing about this one before.
The 3D models were created by studying the molecular sizes and shapes of the relevant molecules and then creating simplified representations. The 3D animation itself was created using Maxon’s Cinema 4D. Then the individual shots were composited together in Adobe’s After Effects. Audacity was used to record the narration, and then it was all put together for timing in Final Cut Pro (I still use an older version and cannot speak to all the changes they made in X.) I went back into After Effects for further labeling and effects (like the zoom into DNA polymerase) after that. So that’s the basic work flow.
There are a lot of biochemical processes that feel like a very complicated ballet as you get further into them. Putting together the action of everything happening at the same time for the final shot in this animation really got me thinking about that analogy again. And the truth is, that when this actually happens in nature, that lagging strand is actually being whipped around by helicase and read in an even more complicated fashion. I really like that we emphasized that we were simplifying for clarity with this one. A lot of educational materials would just let students find that out later if they went on to the next step in their studies. That kind of thing always bothered me when I learned about such processes in school, and I’m happy to be with content experts who are willing to take the time to either make something more accurate, or let students know when things are being brushed over or left out of the picture for clarity. I think that kind of thing is important.
Anyway, I’m really happy to be able to share this with you all.
Animating DNA
I’ve been doing some work to get started on a new animation at work lately. This one is about DNA replication, and some of the animation needed to tell the story is making for some interesting challenges. Now, if you just want to model some DNA within Cinema 4D, this is hands down, the best tutorial I have seen for that.
http://www.bmc.med.utoronto.ca/bmcwiki/doku.php/technologies:cinema_4d_tutorial_-_schematic_dna_1
There’s a part 2 to that too, so do keep going if you get into the first one.
The trouble with this model though, is that you can’t unzip the DNA to show how replication works. So I’ve been trying some alternate methods lately. At first, I was very excited about getting the backbones to open up like this.

But I still couldn’t get the bases to work with me. That version was utilizing the helix shaped splines and sweep nurbs set at 130º. And the spherify deformer could be animated to open the double helix according to keyframes.
One of the tricks with trying to do this is that you can’t apply your deformers to the double helix at large without mangling your model. You do a lot better to apply them directly to your splines and set up your bases as cloners to those splines, and your backbone as sweep nurbs along those same splines, so that the individual strands maintain their shape.
I also learned, that it’s much easier to line up your bases if you start with a straight ladder sort of arrangement, and then apply twist deformers to a null object containing the double helix so that they stay together. You can then animate your deformers along the strand to wind and unwind your DNA, and with the addition of an FFD deformer along each spline, you can then animate the stream opening as you unwind it. And the big trick, that you might not think of with that – uncheck the align clone option in your cloner. For hours and hours, everything I did sent my bases all over the place, until I finally tried unchecking that box, and then they stayed align. I could go on about that for a while, but the important thing is to mention it so we all know not to get stuck like that in the future. Honestly, now that I’m thinking about it, some of my earlier attempts may have actually worked out, had I tried unchecking that box sooner.

And of course, being a big crazy 3D program, there are absolutely other ways of getting at a solution. In looking for ideas with this one, I wound up using the AMI listserve’s professional groups, and came across an animator in Germany named Andrej Piatkowski who found a way to do this without using splines at all. He felt like they just got in the way, and as you can see, he got some really cool results with what he did.
He doesn’t have it connected on the other side, the way I’m wanting for my purposes, but I love how neatly everything fits together and then rips apart so smoothly.
So remember, in your own efforts, there are many paths to the solutions you seek. But hopefully something here can help you out a little if you’re doing similar work.
Translation – The narrated version is up and public
Last week I got permission at Sapling to post the new animation. I went with the narrated version for now. I may post the silent one at a later date.
I learned a lot putting this together. I learned a good bit about working with cloners in Cinema 4D, and got to practice with C4D’s shaders, and even touched on coding a bit with trying to get that mRNA strand to move the way I wanted it to.
All in all, I think it came out really well, both versions actually. I’m proud of it. And I’m really enjoying working with such amazing and knowledgeable folks over at Sapling. I learn the coolest stuff from them, all the time.
Animation in Layers
Goodness me, it’s the 4th of July and I intend to go jump in a pool and play in a little while. But first I wanted to pop in and say a few words over here. Lately over at Sapling I’ve been pretty consumed with an animation that I’m putting together over there. It’s been a whole lot of work, and it’s nearly finished now. I get excited at times like these.
The animation is about the translation process. From a technical standpoint, it’s been interesting how much time I’ve been spending in the program, After Effects. I usually do a little compositing there, but then have generally brought my work into Final Cut Pro or something like that to finish up the actual shot arrangement. With this one, I’ve found it made more sense to actually just put the whole thing together in After Effects. I’m having to be really careful about organization and use a lot of pre-compositions. And even so, I don’t believe that I have ever taken on this many layers of video to wrangle for another project in my entire life. That’s the thing about animation though I guess. You literally make all of it from scratch.
![]()
One thing that I don’t care for in After Effects as opposed to your more editing and less effect driven software, is it’s insistence that every little thing have it’s own layer. This has been one of those pieces for which I’ve wanted a lot of layered subtlety going on behind the scene. It would have been nice to be able to dedicate a couple of tracks for that, rather than adding a new one for every piece of footage used. That being said though, After Effects does a great job at handling image sequence footage and you do have a great deal of control over a lot of details. Still, if anyone from Adobe happens to read this, maybe the next version could at least give us the ability to group tracks into folders. For when you don’t quite want to create a pre-composition and send your tracks to another timeline, but you still want to clean them up a bit for viewing sake, or to add some sort of matting to the whole bundle, just that one little thing would make After Effects so much better in general.
I especially thought that when I got into the part of this animation that I like to call the breakdown. Textbooks often use similar static illustrations to represent things that may or may not atomically look like the molecule in question. And really it’s only rather recently with the work of Dr. Venki Ramakrishnan (video link to a lecture of his about the ribosome and translation process) that we even fully know the exact structure of the ribosome. So one of the things that I’ve been excited to do with this one is to create some more standard looking images and then layer them over the 3D animation. I then keyframed the individual components to follow their 3D counterparts so we can actually see the connection between those representations and a more 3D space. I have been simultaneously irritated with myself for coming up with such a time consuming and intricate thing to create to tell this story, while also really psyched to get to break everything down so clearly. As it’s come together, every codon in the 2D overlay has had to have it’s own layer in After Effects, but now that I finally have everything placed and animated, I’m really excited about it. Back in school, I recall one of our teachers, John Daugherty, telling us about how every piece that you do has to have that thing that makes it really interesting to you as an artist. Whether it’s a concept, or a technique, or whatever, and I think this part of this animation is that for me. It’s something that I don’t see other animations doing, and for me it’s like wrapping up that little aha moment that you get when you’re watching these sorts of things and you finally figure out how one representation relates to another and start to get what it is that you’re seeing.
![]()
As you can see, though, I’ve got these huge blocks of layers in the timeline there. At one point, I had more than 60 in there, and that’s with many of them being pre-compositions that lead to more layers in another timeline. But it’s working. And I just love it when things work.
This is going to be a good one.