Archive for the ‘power point’ tag
Anaplastology Class in Review
One of my classes from last semester wrapped up with a comprehensive Power Point presentation detailing the process we had gone through and what we had learned throughout the semester. I thought I would go ahead and share my slides here.

This was a condensed course wherein we went through the process of making a prosthetic ear with Rosie Seelaus.

We started the semester off with a silicone technology workshop with guest lecturer Leo Basil. This was a real treat for me, as I’d been giving a lot of thought to materials around that time. He spoke a lot about the four primary modifiers of a silicone; polymers, fillers, cross-linkers, and catalysts. Apparently the length of the individual polymer chains in a silicone directly affect the viscosity of the uncured silicone and final elasticity when it is cured. Longer chains create a more viscous fluid and more elastic final product whereas shorter chains will create a thinner solution which cures to be harder.
Your filler can be anything, and a silicone company is unlikely to tell you all their secrets here but it is another way to affect viscosity and thus elasticity. It’s also a common point in the recipe to play with things to increase tear strength, and colorstability, or affect the way the silicone reacts to water.
Your cross-linker is used to harden the polymer material. It literally adds links between molecules. So if you use a lot of it, you wind up with something very hard and brittle because you’ve taken out all the give. Now the cross-linker is the part that is often called the catalyst these days. I’ll discuss that further in the next paragraph.
Now discussing the catalyst gets a little confusing. From what I understand, this is the part that traditionally was added in to set off the reaction, as the definition of the word catalyst would lead you to believe. It can either be platinum or tin, though platinum based products are vastly preferred. Tin based silicones have a bad reputation, because many people working with them have sensitized over time and suffered some bad reactions to them. That history has led many people to upgrade to platinum based silicones, and it has also led silicone companies to predominantly change the way they sell these products. These days the catalyst is actually a part of the uncured silicone when it comes to a clinic or workshop, and it’s the cross-linker that gets added as a catalyst, and often referred to as catalyst. But when silicone manufacturers talk about the catalyst they mean the platinum or tin aspect. Anyway, platinum is the better one. It’s more expensive, but it’s better for the health of the people working with it, and it’s also better for accuracy. Tin based silicones shrink ever so slightly because molecules are lost in the curing process. It’s not very noticeable in the reproduction of an ear, but I am told that in larger pieces it does become noticeable.
There was more to the workshop than that, but if you can understand that, you’re on a good start to understanding silicone.

So the next time we got together was our first official class with Rosie.

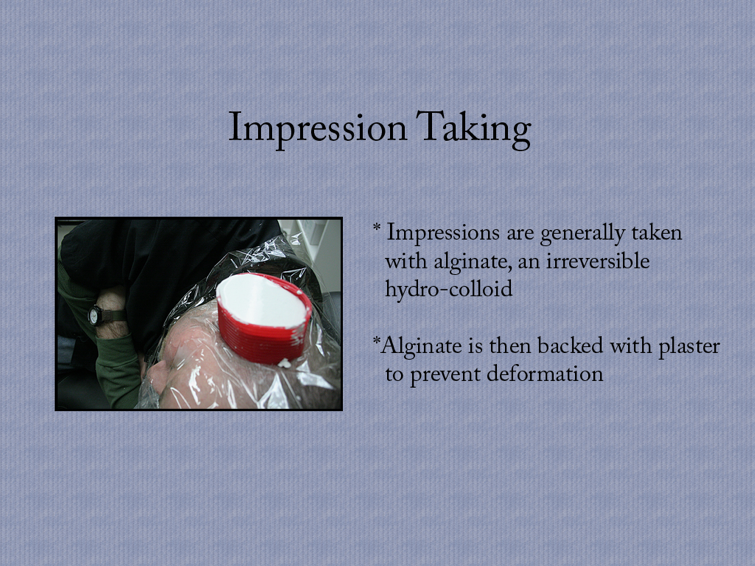
The bases featured above are meant to represent the anatomy of a patient. The idea is that if you were sculpting a prosthetic ear for someone, you would need to tailor the piece to fit patient. Because patients who come in for a prosthetic ear already have some anatomy in place , an anaplastologist would have to design the prosthesis around that individual anatomy.

Impression taking is how we get those bases of the patient’s anatomy, and in this photo, we are also using it to take an impression of a fully formed ear. If a patient is missing one ear, but has another one, this is how that other ear would be captured so that a match might be sculpted. After the impression is taken, a cast can be poured.

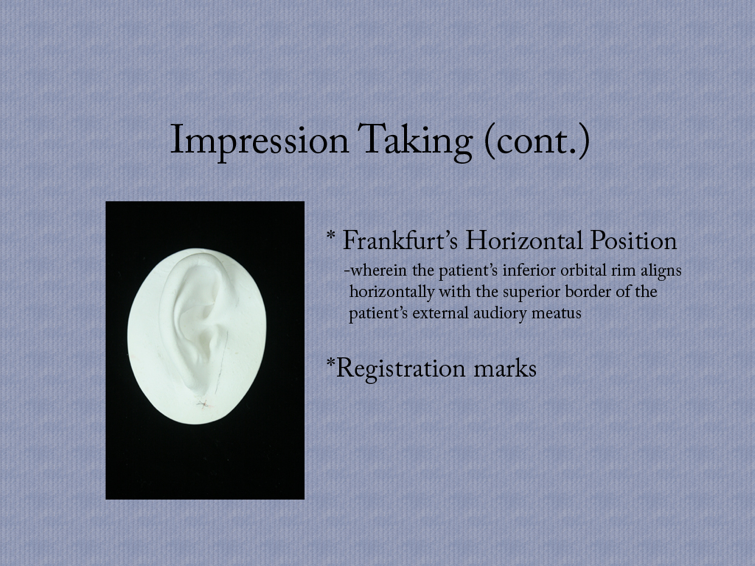
Frankfurt’s horizontal position is an agreed upon positioning of the patient’s head meant to help an anaplastologist maintain orientation while working on a prosthetic ear as to just how it will sit on the base. The idea is that you put the patient into this position, and then you put the registration marks onto their skin. The marks get picked up in the impression, and even transfers one more time into the final cast. By then you’ll probably want to darken them, but the idea is that you have a guide with which to orient yourself.

We got into a discussion of materials that day as well.
Fast set plaster has especially fine particles. It is a really weak stone. Gypsum has been refined to produce a harder denser stone. And dental stone is harder still, but wait there’s more! We have improved dental stone to top the regular stuff! And then there is fuji rock which is a finely milled, very dense, very hard stone.
Then in the wax family, we have baseplate wax. This stuff is fairly hard and very pink. It’s a standard in the creating of dentures and I think that’s how it became such a standard in the anaplastology field. Beeswax is softer, and more of a natural color. I’d actually like to work with this stuff some more. I like materials I can manipulate with my hands, and beeswax is soft enough to allow for that. Boxing wax is also soft, but it’s primary use is for boxing in plaster or stone. You can see it being used in the impression taking slide from before. It’s bright red, and yes it will stain your fingers if you keep playing with it. It comes in handy sheets though, so it is very easy to wrap it around a base or create a confined area for work. And then I think we all have some sense of what clay is. For the purposes of our class, we actually used a blend of clay and baseplate wax.

For the introduction to sculpting, attention to measurements was really emphasized. The tool you see on the left up there is a caliper. Attention to detail at this point when you are first laying down wax will save you time later. If you can establish size and an outline, and match the projection of your model ear, then you can go back in and create the inner contours. The wax shape alone without detail is sometimes called an apple wedge. You’ll notice I also have a transparency up there. This is a great tool, because it allows you to flip the image to see the contours as you will sculpt them in your match. All of this is done with hot wax and some metal tools at this point.

Here I’ve included the ear labeling assignment. I did it first with Photoshop and then was asked to go ahead and do it again in pencil, just for the practice of thinking about those shapes. I have a version of this in Power Point that doesn’t show the pencil side, but rather highlights each of the anatomical areas of the ear. But since this is all being viewed via the web, all those slides just seemed a tad exhaustive. And if you’re really interested, this is an image that I have up at a larger scale in another post anyways.

The image you see on this slide is of the model trimmer. This is really useful in getting those casts and bases level and with an even shape all around. Other fine tuning elements include final texturing you may decide to do to the sculpture itself. For instance you might dimple the wax with an old toothbrush. This breaks up the way light hits it, so it reduces shine, and just provides a little more realistic of a texture. It is also really important to establish a good anterior margin. You want this to be thin, and easy for the patient to smooth down against their skin. It is best to avoid straight lines as well, as these will catch the eye. Instead, you’re aiming for something that will blend as seamlessly as possible.

We met in the clinic one day to look at our individual sculptures and get some feedback before it was time to set these in stone. There was a lot of talk about the tools we had available to us. In my particular case I was having a problem with smoothing out the areas in the tighter spaces. None of the tools in our lab were quite getting in there. There is a tool that is kept in the clinic that is good for that but I wasn’t able to stick around and take advantage of that after our consultations, so I wound up making that tool that you see featured up on the right there. It’s part paperclip and part super sculpey, baked hard. But I think even more useful than that was the little toothpick you see in the larger picture just before the heat gun. It’s amazing how helpful a burnished toothpick can be in sculpting. I learned that one from Ian Coulter, and it just keeps coming in handy.

Once the sculpture is done, and the cast is clean, you can start making the mold. For our purposes we used a three-part mold.

As you can see, you wind up with this nice compact little cylinder.

This is where you hope you’ve done your work well, because the wax sculpture that you put so much effort into is about to get melted. We use two pots for the boil out so that if the first gets dirty, you still have a second pot to remove excess wax residue. It’s really important to get all the wax off from the molds because any residue left behind could inhibit your silicone later and keep your final prosthesis from curing. You also don’t want to leave your mold in boiling water so long that it starts breaking down either. As with most things, you’re looking for that happy balance.

To do this right, you want to mix up a series of colors, not just one. This allows you to mimic the way skin is made up of lots of colors (much like the subsurface scattering modifier in 3DsMax, for those of you who work with that), and also create the illusion of depth in certain areas where appropriate.

The silicone colors are stippled into the mold, and then the whole thing gets clamped and placed in a warm oven. We did this in layers, starting with the red glaze and oven curing in between to keep the colors from mixing and in place where painted. Unfortunately we all had some trouble with the development of air bubbles at this point. There are various strategies to get around this, so there is hope for next time. And one thing that Rosie mentioned which I found interesting was that you often get more bubbles when you oven cure your layers rather than leaving them to bench cure overnight. Obviously leaving every layer to cure overnight makes the whole process take a lot longer, but if you’ve read my documentation of mold making at home with Ian, you might have caught my mention of the difference in the air bubbles between the side of that rubber silicone mold that took over a day to cure, and the second half that I sped up by adding a little extra catalyst to the mix. It’s the added time that allows the air to escape.
Once all layers are in place, the rest is filled with the base color, and the mold gets clamped shut. In my case, I had the problem of my mold breaking under the weight of the clamp. Some of my other classmates had the same problem. I am pretty sure we were using the wrong batch of stone in the lab.

First scissors, then dremmel. The dremmel part works better when you don’t have any air bubbles, but this was a learning process.

When all is said and cured, trimmed and awesome, you get a chance to look at it and ask yourself if it needs a little more color in this spot or that. These are the little touches you can add on with extrinsic coloring. It’s best to have things as close to perfect as possible intrinsically though, because it’s the extrinsic layer that takes the most day to day damage from the world. It’s like the difference between silver painted jewelry and actual silver jewelry. No one wants their ring to get old and worn and start showing copper underneath.
The extrinsic colors are mixed with Medical Adhesive, and painted directly on to the prosthesis. Medical Adhesive, or Med-A as it is often called, is actually a tin based silicone. I think it is more widely accepted than other tin based silicones because it cures just by virtue of being left out in open air. That certainly makes it more convenient anyways. I’ve heard that it can be an irritant to people working with it, but it certainly doesn’t have the bad reputation that other tin based silicones have, and it is widely in use across clinics. In fact a lot of the people who work with it in clinics will go so far as to use it for various household repairs. I wish I could report on what makes this stuff okay, and not the other, but the truth is I don’t know. Maybe it’s just as bad and we simply use it in such small quantities that it doesn’t cause the same problems. Or maybe someone has done something brilliant and one of you fine readers will tell me all about it.

So there is my final prosthetic ear from this semester. All in all I think it came out pretty well. The air bubbles are probably the greatest flaw, and I’m sure my ability to sculpt like that will improve with further experience. I got a little freckle and mole action in there that I was really happy with. I’m thinking that my success with those had a bit to do with having used so much flocking in that part of my mix. If you’re not familiar with flocking, it’s the fuzzy stuff they make pool tables out of and it makes a fun addition to silicone when you’re coloring. I hear it also helps to hold silicone in place before it’s cured, much like Thixo or an anti-slump additive would. My anterior margin isn’t quite as smooth as I would like it to be, but the overall form came out well. It is certainly the best prosthesis I have ever made.
